Create your own pocket sized blockchain in JavaScript

In this article, we’ll explore how we can create a nano sized blockchain with JavaScript. In fact, we’ll be using less than 30 lines of code to achieve this.
But why?

There are two good reasons to follow along. If you know any code, but don’t know anything about blockchain, this will help you get a top-level understanding of what the blockchain comprises of, or, more specifically, the structure of blocks in Bitcoin. The second reason for following along is, if you know a few things about blockchain but only beginning your coding journey, this will be a fun little project to build on.
Without further ado—let’s get cracking!
First is first, we will need to use a cryptography library in order to be able to do one of the most common functions done in Bitcoin and blockchain technology: Hashing. The crypto library we’ll be using is the very popular crypto-js library. Indeed, it is overkill to load the entire library when I can just use the SHA256 component, but let’s keep it simple and short. So from a terminal window (command prompt), type in npm install crypto-js
Our first line will require we load this library object into a variable. We will use the name CryptoJS.

Now we’ll get right into the meat of it. We want to create a class for Blocks. Satoshi Nakamoto did this too on the original Bitcoin codebase in fact. Except Satoshi used C++ and not something as forgiving as JavaScript. But we will follow the same basic structure that Satoshi set out, albeit a simplified one.
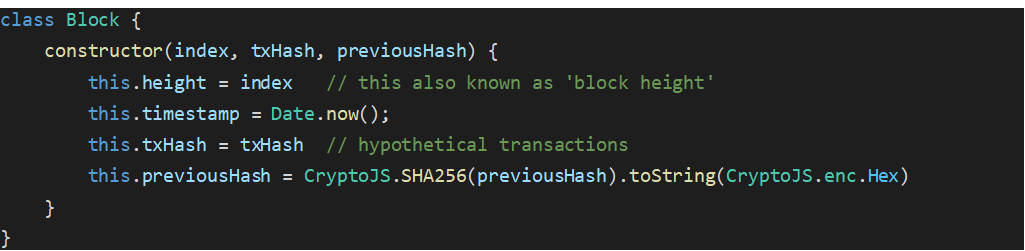
With that we have a class “Block” which will allow us to easily create countless Block instances in our blockchain. So we create a constructor to allow us to easily and dynamically create our Blocks. Each Block will require a number of values to be set. These are the index (commonly called Block height), the time and date stamp, the Merkle root of transactions, and the previous Block hash. These are common attributes for a block, but there are others in Bitcoin, the Nonce being a notable (used in mining).
The index will be a number that we assign each block, consecutively. You will see many block explorers call this “block height” when referencing a particular block. They’re referring to the index value.
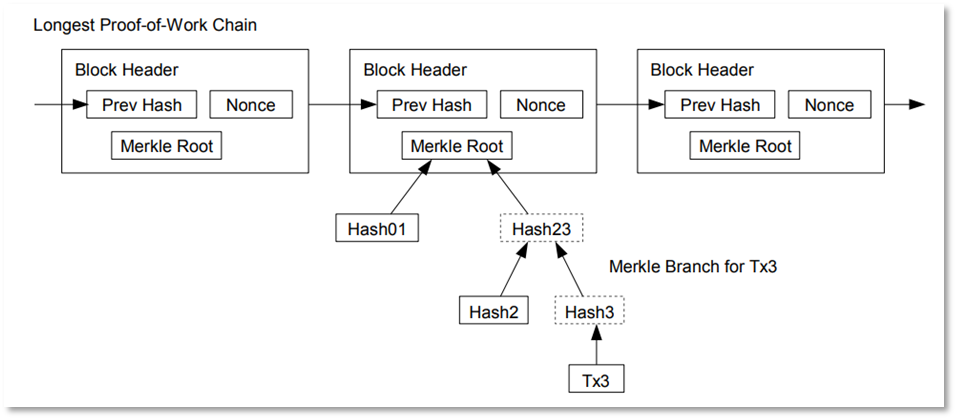
The timestamp is self-explanatory, so we move onto the txHash. This will be a hypothetical value we are plugging in here. Our nano sized blockchain will not actually have any transactions in the blocks, so we will merely put in some arbitrary data to represent this. (We didn’t want to leave it out altogether, as it’s important to the structure of a block). In Bitcoin, block headers hold the “Merkle Root,” which is a hash of all the transactions in that block. So we will at least provide the hash to represent this later in the program.
The ‘previousHash’ parameter is probably the real key here—because this is the link that creates the “chain” to the block-chain. Each block, holds a hash of the previous block. So whenever creating a new block, we want to create pass in the hash of the last block as an argument. He can run the hash function in-line in the constructor, so therefore, we just need to pass in the block.
With our blocks properly defined, we can create a simple function that we can call on to generate the next block.

As mentioned earlier, this function will put some arbitrary data to represent transactions and return a new Block. Since we are passing in the last block as an argument, we have all of the necessary variables to call a new Block instance.
Great! Now we just have to initialize the blockchain array and create our very first block: The Genesis Block.

Manually creating the data in the genesis block will allow us to kick start our chain as it will provide the first set of values which will be hashed into the next block. Remember, each block requires the hash of the previous block. Satoshi did the same in Bitcoin, and we will do the same here. The Genesis block is unique for this reason, and in Bitcoin it has no spendable coin.
With our genesis block created, we can begin a simple Loop, that will generate as many blocks sequentially as desired. In this example, we’ll do 100.
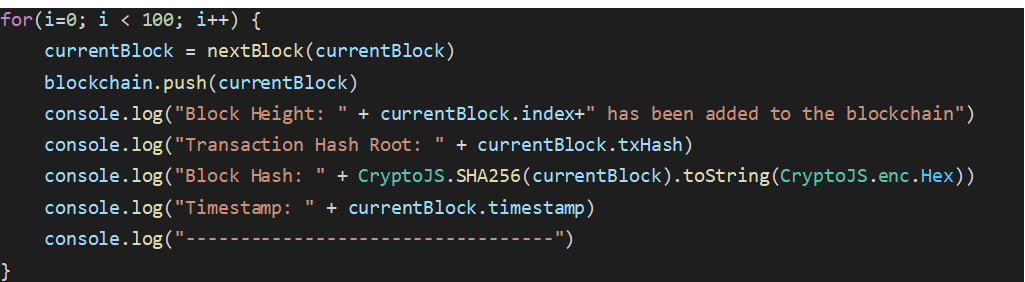
For the purposes of readability, we’ve put some formatting in there. And there you have it, a pocket sized blockchain that creates a sequence of blocks with bare bone structure in less than 30 lines of code!
Of course, there’s a lot more if you want real utility… We would need to build functionality for mining, transactions, networking and much more. But if you can wrap your head around this basic structure, you’re already well ahead of most on understanding Blocks.
The fundamental nature of Bitcoin is that every block builds above the previous block. And all the proof of work that goes into the last block gets hashed into the current block. The continuing of the proof of work cycle sees Bitcoin constantly building its security. But that requires mining…
So if you want to build on this a little, you can try adding a Nonce (with a random number) to the constructor, and before displaying each block, the program must guess what the Nonce is repetitively and not give up until it guesses correctly. This would provide you with a basic mimic of the proof of work function, and how miners solve for the Nonce.
Special thanks to Jonathan Hicks for his input.
@justicemate
Eli Afram
Source: Read Full Article